Blackwater Park is the eighteenth mission of Absolution and takes place at Blackwater Park, a large apartment building in Chicago.
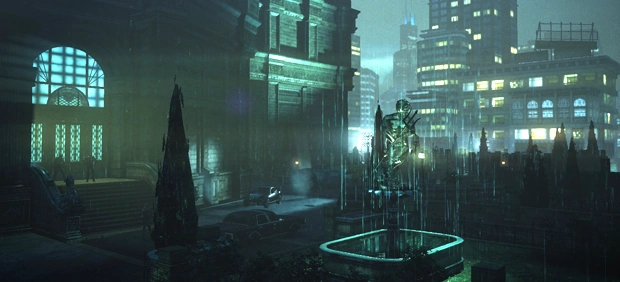
Blackwater Park entrance.
Blackwater Park
The first segment covers the outside park, the staff building, and the basement and first floor of the building. The park and the connecting staff building can be used as an entry point into the lobby to get past the guards watching the entrance. The lobby will be guarded by armed security guards who won't let any non-staff members through. The park, along with a large parking lot, is located along the path to the right of the lobby entrance and has a fairly small guard presence. On the far side, there is a big water pump that can be disabled to lure a custodian out. If you enter the building, there is a room with a ventilation shaft that goes over the guard office in the tunnel and into the Blackwater building basement. A group of NPCs, including guards and custodians, will be talking on the other side of the glass window. Wait for them to finish, at which point they will enter a nearby room with some shelves. Throw something to distract them and then go up the stairs. There will be a checkpoint in the room. From here, if you have the suit, you can try to enter the back part of the first floor, though it's almost impossible to do it without getting spotted since there are a lot of guards and almost no cover in the lobby.
If you're using disguises, the custodian disguise is among the most useful in the lobby since there are almost no other ones on the first floor and it allows access almost anywhere. The goal is the elevator near the reception desk, which is locked with a retinal scanner that only allows the head of security, a bossy woman in a suit who patrols the first floor, to call for the elevator. It can be unlocked in three different ways. Note that the laundry tunnel (in the far-end of the laundry room) seem to have unlimited amount of space for you to get rid of the bodies, dispose 3 in a row undetected and you will get "Laundry Day" challenge unlocked.
Hacking the Lock
- Related Challenge: Hack'n'Backslash

Hack the retinal scanner.
The most direct way of disabling the elevator door is to simply hack the retinal scanner from the security guards' office. There are two guards patrolling inside. You can subdue and/or kill them, but it's actually easier not to since it will cause some noise. The computer is close to a door, so all you really have to do is sneak inside while they are turned away and use it. However, if a move to infiltrate the elevator is not made short after, one of the guards that patrols near the retinal scanner will realize that it has been deactivated, subsequently causing him to head into the security office and reactivate it.
The Head of Security
- Related Challenge: I Got My Eyes on You
The problem with this method is that it is almost impossible to do it without starting a shootout. And this method is not recommended to players playing on higher difficulty. It is done by simply killing or subduing the head of security and then dragging her body to the retinal scanner to unlock the elevator.
The Manager
- Related Challenge: You Can Manage
The building manager's uniform comes in very handy since the head of security is expecting him. The best way to obtain it is to enter the first floor using some disguise and then moving to the area in the back past the reception with the blue lockers, to which the manager will come to smoke. Take cover on the side of the lockers facing the wall. When the manager comes near and the security guard watching the hallway walks away, throw something towards the wall to lure the manager away and subdue him from the corner. Take his disguise, wait for the guard to return to the doorway and turn again and then hide the body in the nearby closet. Find the head of security and she will take you to the elevator and unlock it.
Penthouse


Layla Stockton
The "Penthouse" segment begins near an elevator access room. Beware that every disguise you had access to at the previous segment, including the suit, are rendered useless and only the suits used by the guards can be used to walk among them. Climb the ledge to the walkway and through the door to the penthouse. Quickly go up the stairs around the corner to the right and the go up the stairs to the right. You will come to a halllway guarded by two guards. Take cover behind the sword display and wait for them to walk past or if you are playing on difficulties higher than Normal, throw something to distract them, then enter Lenny's room. It contains a keycard needed to finish the level. Be aware that if you are using the disguise worn by the guards in the penthouse, some of the guards are female. Their uniforms cannot be taken, but they can see through your disguise. The sole target of the segment is Dexter's personal assistant, Layla Stockton. She will be patrolling the penthouse followed by a bunch of armed guards and can be killed in six different ways. Just a sidenote: if you dump bodies via the balcony, the game doesn't count kill, and you must push the guard over the balcony to unlock "Hallelujah" challenge, dumping someone doesn't count. For some reason, a fall from at least 30 stories high won't kill, but this is another way to hide the bodies anyway.
Don't Panic
- Related Challenge: Skin Trade
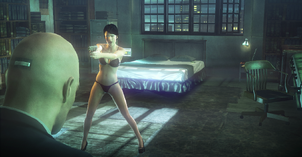
This challenge can not be done with a guard disguise from the floor and takes place in the penthouse's panic room, the blue outline of which can be seen in Instinct Mode. As part of her route, Layla will occasionally step inside. Wait for her behind the table in front of the panic room entrance, which is in a wall next to the shelf in the room with the pool table past the keycard-locked door. You hide behind the table in the corner. Wait for Layla to enter the panic room, then sneak inside while the guards aren't watching.

Quickdraw.
A cutscene will be triggered in which Layla strips to her underwear and tries to seduce 47. She will then point her gun at him and attempt to kill 47. At this point you have a few seconds to shoot and kill her yourself. Note that this cutscene, which is required to complete the challenge "Skin Trade", will not be activated if 47 is disguised as a guard from the floor, even if it shows his face. Furthermore loading a checkpoint created while in disguise eliminates 47's suit from existence.
Regardless, the panic room is a good location to kill Layla discreetly even if you are disguised as a penthouse guard since her guards don't follow her inside, she won't see through the disguise, the body can be hidden in a container in the room and the exit is only a few feet away. You will want to use silenced weapon to be safe, Silverballer or silenced weapon found at the penthouse are good choices. Note, however, that she cannot be ambushed by waiting inside the panic room, as she will not enter and continue on her route. Furthermore she will not leave the fireplace room at all if her guards are taken out.
Sniping
- Related Challenge: Mockingbird
This method is practically served up on a platter and can be done with the 47's suit. In Lenny's room, there is a silenced Kazo TRG near a window. Through the window you can see a part of the balcony which has a hole in the railing that has been sealed off. When Layla walks to it and stands there, wait for the outside guards to look away, then shoot her in the head. If she is pushed over the railing and off of the roof, you will complete the Mockingbird challenge. If the guards were, at any time, put into alert, Layla's patrol pattern may be thrown off, causing her to bypass the location necessary to shoot her off the ledge, good timing is required for a clean and silence kill, if the guards notice someone is shooting, find a place to hide and wait for them to calm down.
The Harpoon
- Related Challenges: Straight to the Heart; Whaling
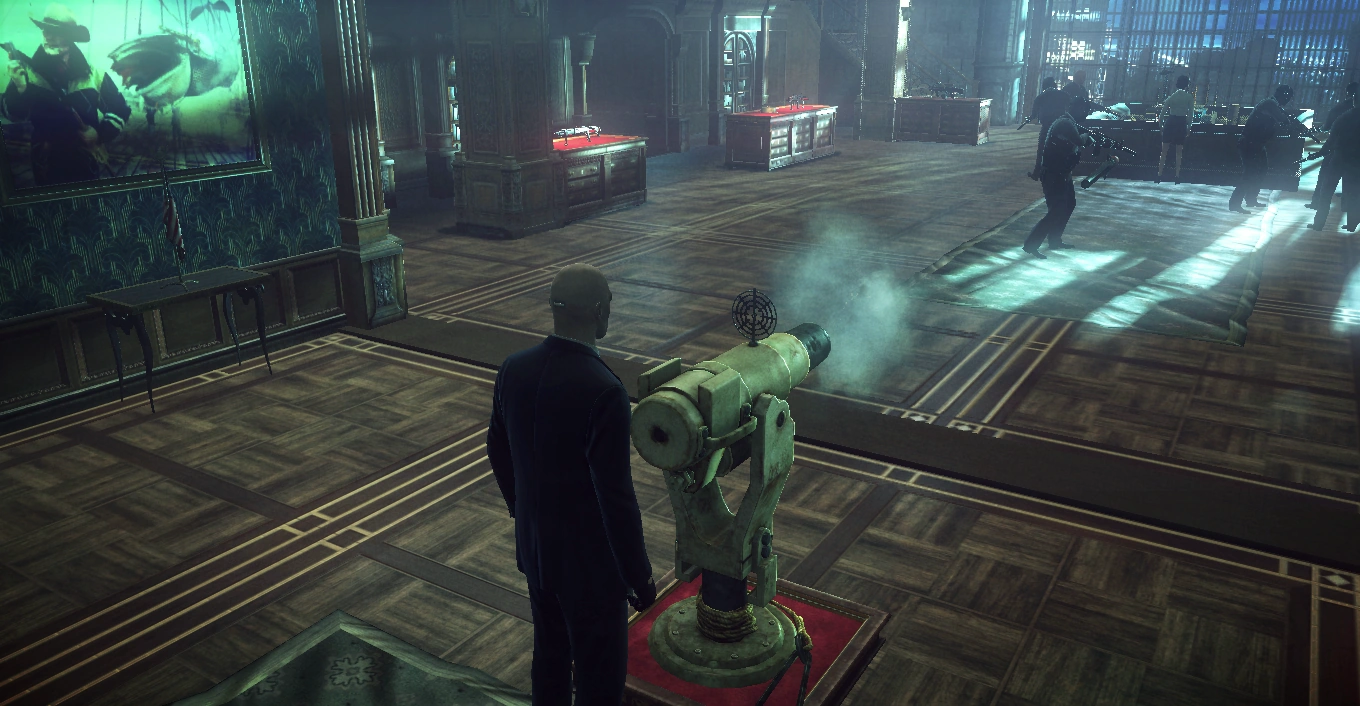

Firing the harpoon on Layla.
This is one of the two ways that can be done in the weapon display room. The model of Dexter Industries can be turned on with a switch on the side facing the window. When Layla enters the room, turn it on to get everyone to walk towards. Meanwhile, use the displays as cover to sneak around to the harpoon cannon. By then, Layla should be in position. Fire the harpoon to impale her, as well as launching her through the glass on the opposite side of the model and into the streets below. This will satisfy the requirement for the "Straight to the Heart" challenge. Note that she also counts towards "Whaling" and it's quite possible to get her and at least one more guard with one shot.
Firing the harpoon can be quite noisy, and if not done carefully, can leave you quite vulnerable to being spotted on higher difficulties. Additionally, it causes quite an uproar in the area, so be cautious when making your way to the exit. If your cover is blown due to this noisy action, try to find a place to find and you might survive the "Hunting" mode. "Whaling" can be completed by killing a total of three enemies with the harpoon; this does not need to be done in a single shot, or a single playthrough.
The Falling Whale
This method is fairly safe and easy to access and can be done with the suit. Above the weapon display room there is a huge whale skeleton hanging above everything which can be dropped by releasing one of the winches on the upstairs walkways. When Layla enters the room, she will stand right below it. Wait for her to arrive and just release the winches to kill her.
Because of the massive size of the whale skeleton, using this method rather than the harpoon method will leave less opposition after the fact. Note, however, that the skeleton is, in fact, collidable, meaning traversing through the aftermath can be difficult, if not impossible.
You can easily complete both Bones and Cetacea simultaneously. Wait between the Dexter Industries diorama and the window, and trigger the diorama distraction as Layla and her entourage approach. Go up the stairs (either side, as both sides have a release lever for the whale) and wait for the enemies to approach the diorama. Every enemy in the room should be drawn to the distraction, giving you plenty of bodies for Cetacea. When everyone is in position, release the whale using the lever.
The Poisoned Sushi
- Related Challenge: Savage Sushi
In the room you enter from the elevator shaft there is a plate of sushi on the table. Layla will occasionally walk past it and eat from it. It can be poisoned with the U'wa Tribe Poison, which is in the far side of the trophy room near Lenny's room. The room is laser-guarded, but the lasers can be seen in Instinct Mode. Avoid the center area, which is guarded by proximity mines. If you move through the room crouching, there are only two vertical lasers that move side to side you have to worry about. If you triggered the laser or blow up the mine, the mission won't fail but you will draw a huge amount of attention. There is a guard near the table with the sushi, but he's facing away, so it's easy enough to poison the sushi. After eating the poisoned sushi, Layla will walk outside to the balcony, start hallucinating and eventually fall down and die. However keep in mind that Layla won't eat sushi if the guard nearby is taken out, or if she's searching after being in Alert status.
The Fireplace Bomb
- Related Challenge: Fired Up
This method is a bit difficult since it requires a gasoline can, which can be hard to bring along. They can be found outdoors in the park area near most lights, but you can also find one near the barbecue on the balcony in the Penthouse. If you go left from the starting point through the hallways and the display room with Samurai armors there is a room with a double door and a fireplace inside. Layla will enter it as part of her route and stand in front of the fireplace. Hide inside and wait for her to get into position. Then move close enough to be able to throw the gasoline can over the grate in the fireplace and throw it into the fire. The can will then explode, killing Layla.
This challenge can be difficult since the gasoline can will often bounce out of the fireplace. If you do not need to get the Silent Assassin bonus, this challenge can be made much easier by throwing the plastique explosives (which you start the level with) into the fire and detonating it when she gets near. This will satisfy the criteria for the challenge, but this will also draw significantly more attention, the guards will be put into Alert, and it may be difficult to remain undetected.
Balcony Ledge
This method is very easy but requires some instinct. When Layla starts to move to the balcony ledge, quickly get downstairs and out the door on the left. Blend in past the passing guard and push the barrier over the ledge. Now, wait till Layla reaches there and looks away. When she looks away, push and send her off into the streets below. Note that her death also counts in the "Hallelujah" challenge.
Exiting
The mission is concluded by picking up the cell phone on the bed in the panic room.
Evidence

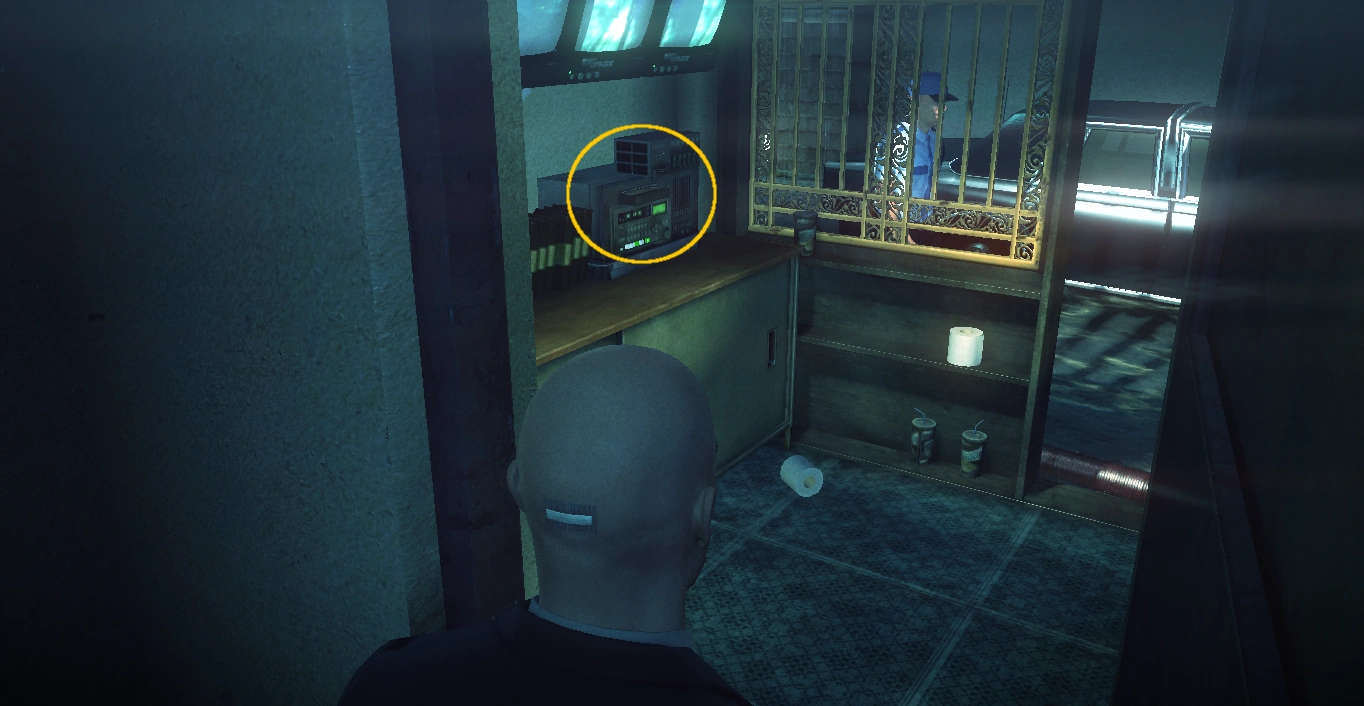
The first piece of evidence.
The first piece of evidence, located in Blackwater Park, can be found in the guard booth near the parking garage. It is typically patrolled by two guards, which can be quite tricky to get around. Distract, subdue, and stash each of them if needed. The evidence is located in a VCR on the counter beneath the monitors.

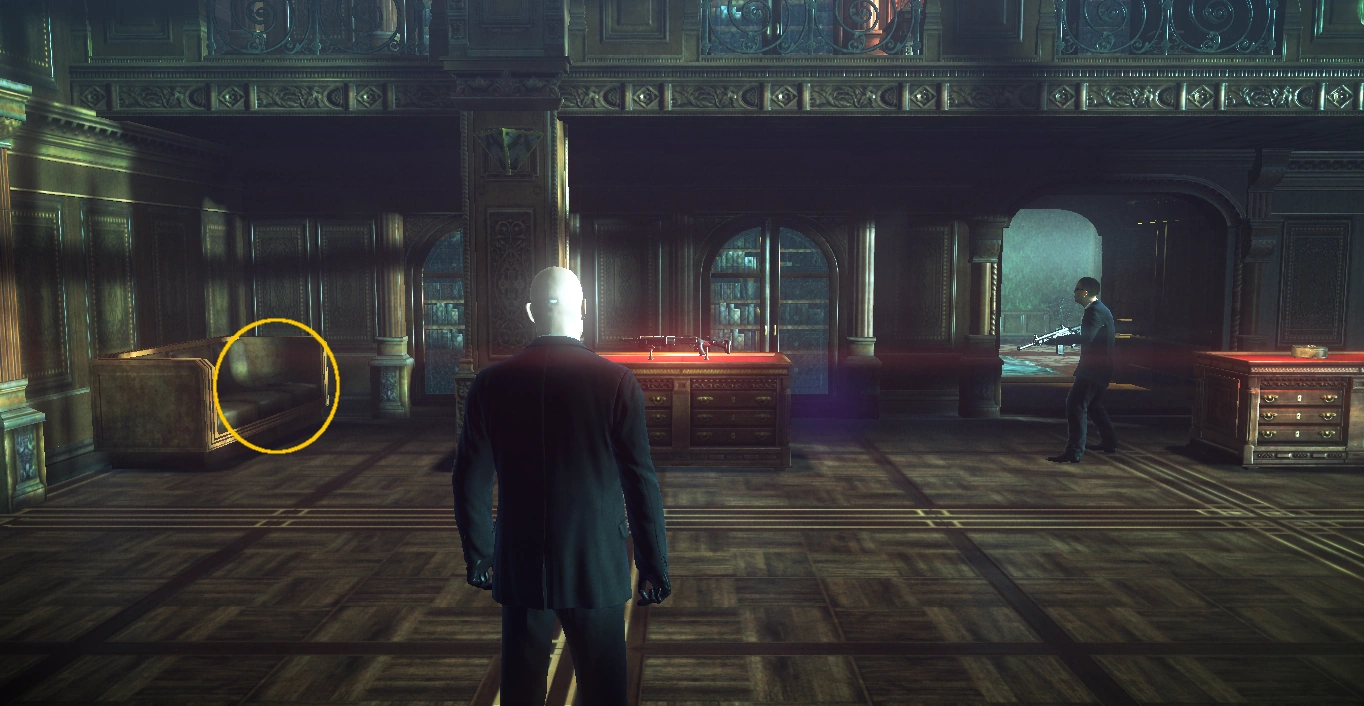
The second piece of evidence.
The second piece of evidence, located in The Penthouse, can be found in the main weapon display room, just to the left of the archway leading towards the panic room. The evidence rests atop the right cushion of a couch in the corner. The perimeter of the display cases can be followed while in cover, making it quite easy to grab on normal and hard difficulties.
Disguises
| Disguise | Location |
|---|---|
| Blackwater Bodyguard | Worn by numerous guards patrolling the interior and exterior of the penthouse. |
| Blackwater Custodian | Worn by several custodians located in the utility room downstairs. |
| Blackwater Manager | Worn by the manager, who frequently takes smoke breaks in the rear hallway of the main floor. |
| Blackwater Park Exterior Guard |
Worn by numerous guards patrolling the exterior perimeter of the building. |
| Blackwater Park Interior Guard |
Worn by numerous guards patrolling the interior of the building's main floor. |
| Blackwater Receptionist | Worn by the three receptionists in the lobby of the building. |
| Blackwater Tactical Team | Worn by several guards in the penthouse. |
| Plumber | Worn by the plumber hired to extract water from the underground parking structure. Follow the outside of the building around until you come to a blue van and wait for the plumber to appear. |
| Samurai | On display in the penthouse in several different locations. |
Challenges
| Icon | Name | Obtain | |
|---|---|---|---|

|
Chameleon | Use the each of the disguises. | |

|
Evidence Collector | Collect the evidence in Blackwater Park and Penthouse. | |

|
Infiltrator | Complete the mission without being spotted. | |

|
Suit Only | Complete the mission without changing out of the beginning outfit. | |

|
Crash Course | Play the movie reel on the projector. | |

|
Laundry Day | Hide three bodies in the laundry shoot on the main floor. | |

|
Horn of Plenty | Complete the Savage Sushi, Straight To The Heart, Bones, Mockingbird, Fired Up, and Skin Trade challenges. | |

|
You Can Manage | Obtain the manager disguise, talk with the Head of Security and enter the elevator wearing it. Cannot be done if the Head of Security is searching after being put into alert. | |

|
I Got My Eyes on You | Use the head of security's eye to bypass the retinal scanner on the elevator. | |

|
Hack'n'Backslash | Hack the retinal scanner terminal and then access the elevator. | |

|
Mile High Club | Complete the You Can Manage, I Got My Eyes on You, and Hack’n’Backslash challenges. | |

|
Hit Him Where it Hurts | Finish the mission; no requirements. | |

|
Whaling | Kill three guards with harpoon (cumulative). | |

|
Cetacea | Kill five guards by dropping the whale skeleton on them. The diorama can be used to draw enemies into position. | |

|
Hallelujah | Dump five bodies over the edge of the building (cumulative). | |

|
Savage Sushi | Poison Layla's sushi to kill her. | |

|
Straight to the Heart | Kill Layla with the harpoon. | |

|
Bones | Kill Layla by dropping the whale skeleton on her. The diorama may need to be used to draw her into position. | . |

|
Fired Up | Sabotage Layla's fireplace by tossing a gasoline can into it. Alternatively, throw the plastic explosives into the fire and detonate when she gets close. | |

|
Mockingbird | Snipe Layla off the edge of the building. | |

|
Skin Trade | Confront Layla in the panic room, and kill her when she draws. She may be killed in any fashion after the cutscene ends. | |

|
Blue Collar | Complete the mission wearing the plumber disguise. You must finish the hotel while wearing the disguise in order to begin in Penthouse wearing it. You may be spotted while in the hotel, but you must complete Penthouse without being seen. | |

|
Ronin - Part I | Kill an NPC with a katana while wearing the samurai disguise. | |

|
Ronin - Part II | Stealth kill seven NPCs with a katana while wearing the samurai disguise (being spotted stops the count). Timed. | |

|
Ronin - Part III | Stealth kill Layla with a katana while wearing the samurai disguise. | |

|
Mastery: Blackwater Park | Complete all other challenges. |
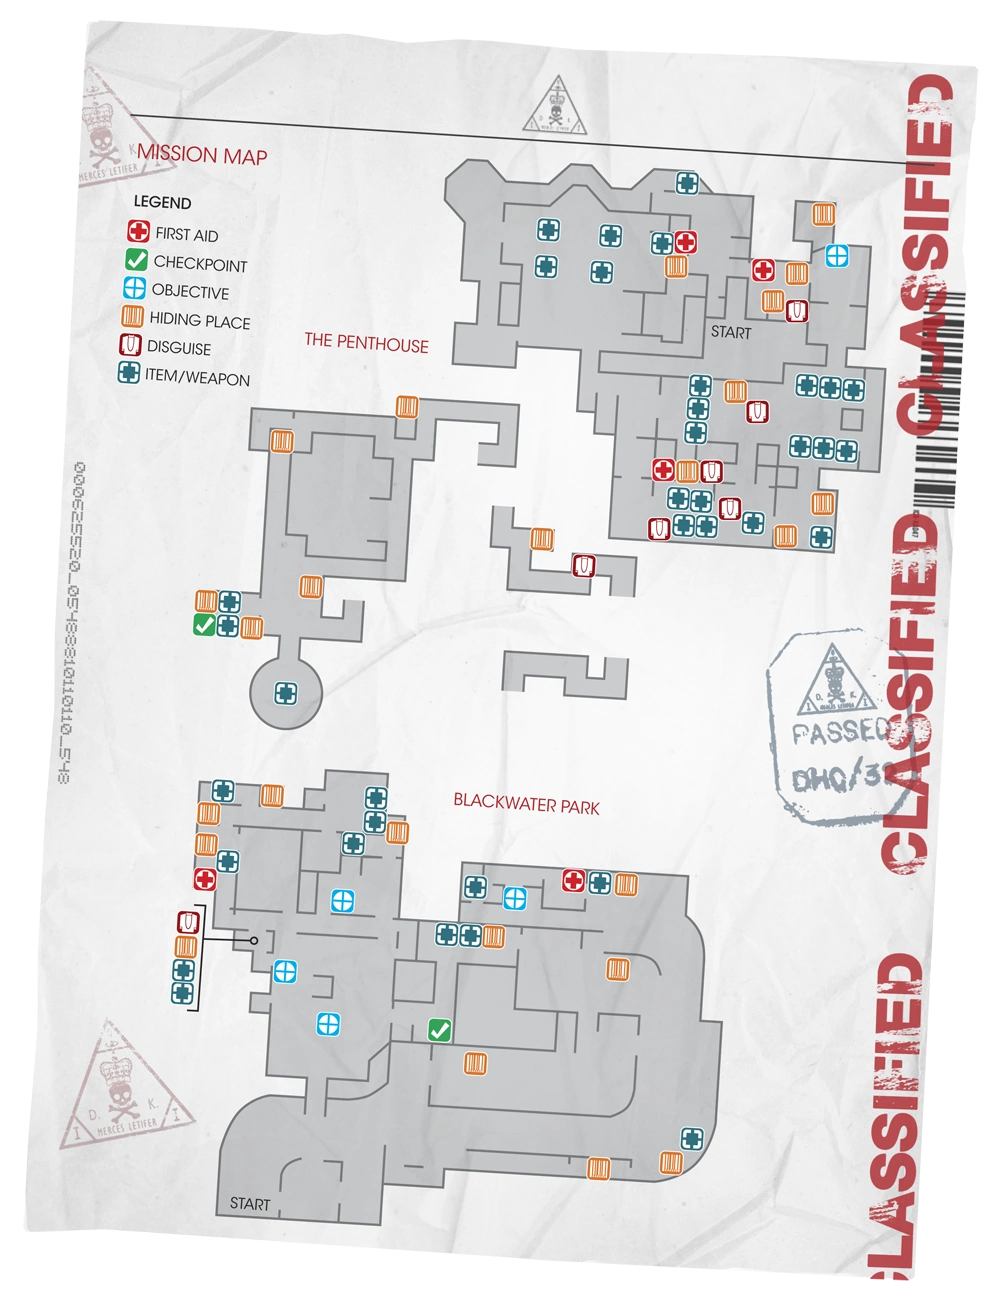
Map